....contnd
you must have already gone through part 1 of the blog. if not, please go through that first before proceeding ahead.
3. Product images:
To make any changes to a image format, we will be using the attribute group "Default product attribute group". if you see the XML for Image, there are 5 different URL tags that are mapped. It simply means that we can have maximum of 5 images stored per product with the suffix of
/Products/ <ProductNumber>_000_001.jpg
/Products/ <ProductNumber>_000_002.jpg
/Products/ <ProductNumber>_000_003.jpg
/Products/ <ProductNumber>_000_004.jpg
/Products/ <ProductNumber>_000_005.jpg
"ProductNumber" here simply means the ItemId we have.
CPOS/MPOS will display same number of images as stored at Product folder
Service Volume(drive)>>Retail Server >>Webroot>>MediaServer >>Products
and product window will look like
Final URL for product will look like
https://*****devret.cloudax.dynamics.com/MediaServer/Products/81100_000_001.png
4. Category images:
"Default category attribute group" can be used to make any required change in format.
Category folder would be
Service Volume(drive)>>Retail Server >>Webroot>>MediaServer >>Categories
Default setup allows Retail server to display the category images by following the URL as
/Categories/{CategoryName}.png
However, if image has some different name or you want to display some other image irrespective of its name. you can follow the steps as mentioned below.
i.) Open product categories form as
Retail and commerce>>Products and categories>> product categories
ii.) Select category where you want to change the image as per your choice
iii). Then, click on Edit button.
iv.) Now, click on CATEGORY tab , it will show more options available under that.
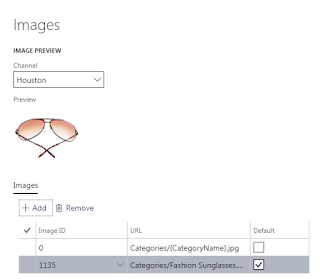
v.) Then click on images, it will open a separate form dialog as shown below.
Current image of Category is as

vi.) Now, select the required channel and click on Add button. It will again show a popup dialog. I am taking a image as fashion sunglasses for now.
and then click on OK.
vii.) It will save the image as below. Make it default and click on OK.
viii.) click SAVE on category form , run the distribution job 1040 and login to CPOS to see the effect.
final URL to check if image is appearing correctly would be something like this
https://*******devret.cloudax.dynamics.com/MediaServer/Categories/Fashion Sunglasses.png
It is recommended not to change default conventions available to store images. Change only when it is the last option.
That's it for now. Post your suggestions and questions if any.
you must have already gone through part 1 of the blog. if not, please go through that first before proceeding ahead.
3. Product images:
To make any changes to a image format, we will be using the attribute group "Default product attribute group". if you see the XML for Image, there are 5 different URL tags that are mapped. It simply means that we can have maximum of 5 images stored per product with the suffix of
/Products/ <ProductNumber>_000_001.jpg
/Products/ <ProductNumber>_000_002.jpg
/Products/ <ProductNumber>_000_003.jpg
/Products/ <ProductNumber>_000_004.jpg
/Products/ <ProductNumber>_000_005.jpg
"ProductNumber" here simply means the ItemId we have.
CPOS/MPOS will display same number of images as stored at Product folder
Service Volume(drive)>>Retail Server >>Webroot>>MediaServer >>Products
and product window will look like
Final URL for product will look like
https://*****devret.cloudax.dynamics.com/MediaServer/Products/81100_000_001.png
4. Category images:
"Default category attribute group" can be used to make any required change in format.
Category folder would be
Service Volume(drive)>>Retail Server >>Webroot>>MediaServer >>Categories
Default setup allows Retail server to display the category images by following the URL as
/Categories/{CategoryName}.png
However, if image has some different name or you want to display some other image irrespective of its name. you can follow the steps as mentioned below.
i.) Open product categories form as
Retail and commerce>>Products and categories>> product categories
ii.) Select category where you want to change the image as per your choice
iii). Then, click on Edit button.
iv.) Now, click on CATEGORY tab , it will show more options available under that.
v.) Then click on images, it will open a separate form dialog as shown below.

vi.) Now, select the required channel and click on Add button. It will again show a popup dialog. I am taking a image as fashion sunglasses for now.
and then click on OK.
vii.) It will save the image as below. Make it default and click on OK.
viii.) click SAVE on category form , run the distribution job 1040 and login to CPOS to see the effect.
final URL to check if image is appearing correctly would be something like this
https://*******devret.cloudax.dynamics.com/MediaServer/Categories/Fashion Sunglasses.png
It is recommended not to change default conventions available to store images. Change only when it is the last option.
That's it for now. Post your suggestions and questions if any.


I think the admin of this web site is actually working
ReplyDeletehard for his website, as here every stuff is quality based data.
I really enjoy looking through on this web site, it has got superb blog posts.
ReplyDeleteThank you for the sensible critique. Me and my neighbor
ReplyDeletewere just preparing to do a little research about this.
We got a grab a book from our area library but I think I learned
more from this post. I'm very glad to see such magnificent information being shared freely out there.
Thanks everyone, I am glad you all liked it...will be more than happy to share more information in future..
ReplyDeleteThanks for your post. However, I don't know where to upload product image for below url?
ReplyDelete/Products/ _000_001.jpg
/Products/ _000_002.jpg
/Products/ _000_003.jpg
/Products/ _000_004.jpg
/Products/ _000_005.jpg
It would be under your service drive...retailserver>Webroot>MediaServer>Products
Delete