Thursday, 6 June 2024

PGP Encryption and Digital signature in Dynamics 365 Finance and Operations for payment files

In this blog post I am going to discuss about Digital signature and PGP encryption for txt/xml data. This is generally required for payment processing files being sent out of D365 FO. 

As a pre-requisite, you must have a PGP encrypted public key in format as

-----BEGIN PGP PUBLIC KEY BLOCK-----

key content

-----END PGP PUBLIC KEY BLOCK-----


, a private key (if you don't have, then generate it using kleopatra tool) in format as 

-----BEGIN PGP ARMORED FILE-----

key content

-----END PGP ARMORED FILE-----


and a passphrase for private key. 

These keys and passphrase must be securely stored. I have stored it over Azure key vault and is using D365 Key vault parameters to retrieve that using azure client app. (for Dev box, Same is possible via txt files stored locally too, Or as a resource file for Dev and other environments, Or as a txt file over azure storage account).

Although its the safest way to use azure key vault, but there is a minor problem as to how the whole key is stored. Generally key must include special characters '\r\n' (Not directly visible unless read via code or using tools such as notepad++), when pasting it over key vault it ignores the new lines and considers whole data as a single line. To overcome this, do use the line ending characters before pasting it to key vault as

-----BEGIN PGP PUBLIC KEY BLOCK-----\r\nVersion: PGP Command Line v10.1.0 (Build 52) (Linux)\r\n\r\nkey content\r\n-----END PGP PUBLIC KEY BLOCK----

Once you are finalized with all these, lets proceed for code. 

We will start with the PGP helper class/


using Org.BouncyCastle.Bcpg.OpenPgp;
using Org.BouncyCastle.Security;
using Org.BouncyCastle.Bcpg;

class PGPHelper
{
   /// 
/// SignFile
/// 
/// System.IO.Stream
/// str
/// System.IO.Stream
public System.IO.Stream SignFile(System.IO.Stream _inputFile, System.IO.Stream _privateKeyStream, Str _passphrase)
{
    PgpSecretKey secretKey = this.ReadSecretKey(_privateKeyStream);

    System.Byte[] passPhraseByte = System.Text.Encoding::UTF8.GetBytes(_passphrase);
    System.Char[] passPhraseChar = System.Text.Encoding::UTF8.GetChars(passPhraseByte);
    PgpPrivateKey privateKey = secretKey.ExtractPrivateKey(passPhraseChar);

    System.IO.Stream outputStream = new System.IO.MemoryStream();
    PgpSignatureGenerator pgpSignatureGenerator = new PgpSignatureGenerator(privateKey.PublicKeyPacket.Algorithm, Org.BouncyCastle.Bcpg.HashAlgorithmTag::Sha256);
    pgpSignatureGenerator.InitSign(0, privateKey);

    PgpLiteralDataGenerator literalData = new PgpLiteralDataGenerator();
    System.Char format = Global::toanytype('b');
    var literalOut = literalData.Open(outputStream, format, "filename", _inputFile.Length, DateTimeUtil::utcNow());

    var signatureOut = pgpSignatureGenerator.GenerateOnePassVersion(false);
    signatureOut.Encode(literalOut);

    _inputFile.CopyTo(literalOut);

    var signature = pgpSignatureGenerator.Generate();
    signature.Encode(literalOut);

    literalOut.Close();
    outputStream.Position = 0;

    return outputStream;
}

/// 
/// SignAndEncryptData
/// 
/// System.IO.Stream
/// str
/// System.byte
/// system.byte
public System.Byte[] SignAndEncryptData(System.IO.Stream _publicKeyFileStream, System.IO.Stream _secretKeyFileStream, Str _privateKeyPassword, System.Byte[] _messageDataArray)
{
    try
    {
        PgpPublicKey pubKey = this.ReadPublicKey(_publicKeyFileStream);
        PgpSecretKey secretKey = this.ReadSecretKey(_secretKeyFileStream);

        System.Byte[] passPhraseByte = System.Text.Encoding::UTF8.GetBytes(_privateKeyPassword);
        System.Char[] passPhraseChar = System.Text.Encoding::UTF8.GetChars(passPhraseByte);

        using (var outputStream = new System.IO.MemoryStream())
        {
            this.SignAndEncrypt(outputStream, _messageDataArray, secretKey, passPhraseChar, pubKey, true, true);
            return outputStream.ToArray();
        }
    }
    catch
    {
        throw error('Error during sign and encrypt process');             
    }
}

private void SignAndEncrypt(System.IO.Stream _outputStream, System.Byte[] _clearData, PgpSecretKey _secretKey, System.Char[] _secretPwd, PgpPublicKey _publicKey, Boolean _armored, Boolean _withIntegrityCheck)
{
    if (_armored)
    {
        _outputStream = new ArmoredOutputStream(_outputStream);
    }

    try
    {
        PgpEncryptedDataGenerator encryptedDataGenerator = new PgpEncryptedDataGenerator(SymmetricKeyAlgorithmTag::Cast5, _withIntegrityCheck, new SecureRandom());
        encryptedDataGenerator.AddMethod(_publicKey);
        System.Byte[] buffer = new System.Byte[1 << 16]();

        using (System.IO.Stream encryptedOut = encryptedDataGenerator.Open(_outputStream, buffer))
        {
            var compressedDataGenerator = new PgpCompressedDataGenerator(CompressionAlgorithmTag::Uncompressed);
            using (System.IO.Stream compressedOut = compressedDataGenerator.Open(encryptedOut))
            {
                PgpPrivateKey privateKey = _secretKey.ExtractPrivateKey(_secretPwd);
                var signatureGenerator = new PgpSignatureGenerator(_secretKey.PublicKey.Algorithm, HashAlgorithmTag::Sha256);                    
                signatureGenerator.InitSign(0, privateKey);
                
                System.Collections.IEnumerable enumUserLiterals = _secretKey.PublicKey.GetUserIds();

                //str userId;enumUserLiterals.getnext();
                System.Collections.IEnumerator inumerator = enumUserLiterals.GetEnumerator();

                while (inumerator.moveNext())
                {
                    PgpSignatureSubpacketGenerator subpacketGenerator = new PgpSignatureSubpacketGenerator();
                    //subpacketGenerator.AddSignerUserId(false, userId);
                    //subpacketGenerator.SetIssuerFingerprint(false, _secretKey.PublicKey);
                    subpacketGenerator.SetSignerUserId(false, inumerator.Current);
                    subpacketGenerator.SetIssuerKeyID(false, _secretKey.PublicKey.KeyId);
                    signatureGenerator.SetHashedSubpackets(subpacketGenerator.Generate());
                    break;
                }

                signatureGenerator.GenerateOnePassVersion(false).Encode(compressedOut);

                var literalDataGenerator = new PgpLiteralDataGenerator();
                System.Char binaryformat = Global::toanytype('b');
                using (System.IO.Stream literalOut = literalDataGenerator.Open(compressedOut, binaryformat , "embeddedFileName", _clearData.Length, DateTimeUtil::utcNow()))
                {
                    using (System.IO.Stream inputData = new System.IO.MemoryStream(_clearData))
                    {
                        int ch = inputData.ReadByte();
                        while (ch >= 0)
                        {
                            //literalOut.WriteByte((byte)ch);
                            //signatureGenerator.Update((byte)ch);
                            literalOut.WriteByte(ch);
                            signatureGenerator.Update(ch);

                            ch = inputData.ReadByte();
                        }
                    }
                }

                signatureGenerator.Generate().Encode(compressedOut);
            }
        }

        if (_armored)
        {
            _outputStream.Close();
        }
    }
    catch
    {
        throw error("Error occurred during sign and encrypt process.");
    }
}

private PgpPublicKey ReadPublicKey(System.IO.Stream _publicKeyFileStream)
{
    System.IO.Stream decodedStream  = PgpUtilities::GetDecoderStream(_publicKeyFileStream);
    PgpPublicKeyRingBundle pgpPub = new PgpPublicKeyRingBundle(decodedStream);
    PgpPublicKeyRing kRing;
    System.Collections.IEnumerator kRingenumerator = pgpPub.GetKeyRings().GetEnumerator();
    while (kRingenumerator.MoveNext())
    {
        kRing = kRingenumerator.Current;
        PgpPublicKey k;
        System.Collections.IEnumerator kenumerator = kRing.GetPublicKeys().GetEnumerator();
        while (kenumerator.MoveNext())
        {
            k = kenumerator.Current;
            if (k.IsEncryptionKey)
            {
                return k;
            }
        }
    }

    throw error('No encryption key found in public key ring.');
}

private PgpSecretKey ReadSecretKey(System.IO.Stream _secretFileKey)
{
    System.IO.Stream decodedStream = PgpUtilities::GetDecoderStream(_secretFileKey);
    PgpSecretKeyRingBundle pgpSec = new PgpSecretKeyRingBundle(decodedStream);

    PgpSecretKey secretKey;
    PgpSecretKeyRing kRing;
    System.Collections.IEnumerator kRingenumerator = pgpSec.GetKeyRings().GetEnumerator();
    while (kRingenumerator.MoveNext())
    {
        kRing = kRingenumerator.Current;

        PgpSecretKey k;
        System.Collections.IEnumerator kenumerator = kRing.GetSecretKeys().GetEnumerator();
        while (kenumerator.MoveNext())
        {
            k = kenumerator.Current;
            if (k.IsSigningKey)
            {
                secretKey = k;
                break;
            }
        }

        if (secretKey != null)
        {
            break;
        }
    }

    if (secretKey == null)
    {
        throw error('No signing key found in secret key ring.');
    }


    return secretKey;
}

/// 
/// EncryptFile
/// 
/// System.IO.Stream
public System.IO.Stream EncryptFile(System.IO.Stream _inputFile, System.IO.Stream _publicKeyStream)
{
    PgpPublicKey publicKey = this.ReadPublicKey(_publicKeyStream);
    System.IO.MemoryStream outputStream = new System.IO.MemoryStream();

    // Armored output
    ArmoredOutputStream armoredStream = new ArmoredOutputStream(outputStream);

    // Encryption generator
    PgpEncryptedDataGenerator encryptedData = new PgpEncryptedDataGenerator(SymmetricKeyAlgorithmTag::Cast5, true, new SecureRandom());
    encryptedData.AddMethod(publicKey);

    using (System.IO.Stream encryptedOut = encryptedData.Open(armoredStream, new System.Byte[1 << 16]()))
    {
        // Optional compression
        PgpCompressedDataGenerator compressedData = new PgpCompressedDataGenerator(CompressionAlgorithmTag::Uncompressed);
        using (System.IO.Stream compressedOut = compressedData.Open(encryptedOut))
        {
            // Literal data
            PgpLiteralDataGenerator literalData = new PgpLiteralDataGenerator();
            System.Char binaryformat = Global::toanytype('b');
            using (System.IO.Stream literalOut = literalData.Open(compressedOut, binaryformat, "data", _inputFile.Length, DateTimeUtil::utcNow()))
            {
                _inputFile.CopyTo(literalOut);
            }
        }
    }

    armoredStream.Close();
    outputStream.Position = 0;
    return outputStream;
}
}

Code can be modified if compression is needed. (I have it commented, just uncomment it if needed).
Next to use the helper class to do the actual encryption and signature. 

We can read the file contents to be encrypted or use the data generated at runtime using io.stream.


internal final class RunnableClass1
{
	public static void main(Args _args)
    {
        KeyVaultParameters          keyVaultParameters;
                KeyVaultCertificateTable    certTable;
                //FinTechDotNetLib.PgpHelper pgpHelper = new FinTechDotNetLib.PgpHelper();
                PGPHelper   pgpHelper = new PGPHelper();
                System.IO.Stream encryptedStream;
                System.IO.Stream signedStream;
                
         select keyVaultParameters
            where  keyVaultParameters.Name = 'keyVaulttest';
            
            System.IO.Stream streamName = new System.IO.MemoryStream(System.Text.Encoding::UTF8.GetBytes(System.IO.File::ReadAllText(@"D:\Test.xml")));
            
              str publicKey = KeyVaultCertificateHelper::getManualSecretValue(KeyVaultCertificateTable::findByName('publickey').RecId);
              
               str privateKey = KeyVaultCertificateHelper::getManualSecretValue(KeyVaultCertificateTable::findByName('privatekey').RecId);
               
                 str formattedPublicKey;
  formattedPublicKey = strReplace(publicKey, "\\r\\n", '\r\n');

  str formattedPrivateKey;
  formattedPrivateKey = strReplace(privateKey, "\\r\\n", '\r\n');
              
 System.IO.Stream publicKeyStream    = new System.IO.MemoryStream(System.Text.Encoding::UTF8.GetBytes(formattedPublicKey));
 System.IO.Stream privateKeyStream   = new System.IO.MemoryStream(System.Text.Encoding::UTF8.GetBytes(formattedPrivateKey));
 
  if (keyVaultParameters.DigitalSignature && keyVaultParameters.Encryption) //These are custom No/Yes field
                {
                    System.Byte[] signedAndEncryptedByte = pgpHelper.SignAndEncryptData(publicKeyStream, privateKeyStream, KeyVaultCertificateHelper::getManualSecretValue(KeyVaultCertificateTable::findByName('passphrase').RecId), dataByte);
                     signedAndEncryptedStream = new System.IO.MemoryStream(signedAndEncryptedByte);
                }
                else if (keyVaultParameters.DigitalSignature && !keyVaultParameters.Encryption) //This is custom No/Yes field
                {
                    signedStream = pgpHelper.SignFile(streamName, formattedPrivateKey, KeyVaultCertificateHelper::getManualSecretValue(KeyVaultCertificateTable::findByName('passphrase').RecId));
                }              
                else if (keyVaultParameters.Encryption && !keyVaultParameters.DigitalSignature) //These are custom No/Yes field
                {
                    encryptedStream = pgpHelper.EncryptFile(streamName, formattedPublicKey);
                }
                
                if(keyVaultParameters.DigitalSignature && keyVaultParameters.Encryption)
                {
                	System.IO.StreamReader streamReader = new System.IO.StreamReader(signedAndEncryptedStream);
                	info (streamReader.ReadToEnd());
                }
                else if (keyVaultParameters.DigitalSignature && !keyVaultParameters.Encryption)
                {
                    System.IO.StreamReader streamReader = new System.IO.StreamReader(signedStream);
                	info (streamReader.ReadToEnd());
                }
                else
                {
                      System.IO.StreamReader streamReader = new System.IO.StreamReader(encryptedStream);
                      info (streamReader.ReadToEnd());
                }
    }
}

Helper class can also be designed using C# and .Net assembly can then be used to pass the file stream and key strings, but its just easier to manage that with x++ and is easy to debug in case of any issues. 

Below is equivalent C# Code for helper if  needed.
using System;
using System.Linq;
using System.Text;
using System.IO;
using Azure.Identity;
using Azure.Security.KeyVault.Secrets;
using Org.BouncyCastle.Bcpg.OpenPgp;
using Org.BouncyCastle.Security;

namespace FinTechDotNetLib
{
    public class PgpHelper
    {
        public Stream EncryptFile(Stream inputFile, string publicKeyString)
        {
            PgpPublicKey publicKey = ReadPublicKey(publicKeyString);

            MemoryStream outputStream = new MemoryStream();

            PgpEncryptedDataGenerator encryptedDataGenerator = new PgpEncryptedDataGenerator(Org.BouncyCastle.Bcpg.SymmetricKeyAlgorithmTag.Cast5, true, new SecureRandom());
            encryptedDataGenerator.AddMethod(publicKey);

            using (Org.BouncyCastle.Bcpg.ArmoredOutputStream armoredOut = new Org.BouncyCastle.Bcpg.ArmoredOutputStream(outputStream))
            {
                // Open the encrypted stream
                using (Stream encryptedOut = encryptedDataGenerator.Open(armoredOut, new byte[1 << 16]))
                {
                    //PgpCompressedDataGenerator compressedDataGenerator = new PgpCompressedDataGenerator(Org.BouncyCastle.Bcpg.CompressionAlgorithmTag.Uncompressed);
                    //Stream compressedOut = compressedDataGenerator.Open(encryptedOut);

                    // Write the input file data to the encrypted stream
                    byte[] buffer = new byte[1 << 16];
                    int len;
                    while ((len = inputFile.Read(buffer, 0, buffer.Length)) > 0)
                    {
                        encryptedOut.Write(buffer, 0, len);
                    }
                }
            }

            outputStream.Position = 0;

            return outputStream;
        }

        public Stream SignFile(Stream inputFile, string privateKeyString, string passphrase)
        {
            PgpPrivateKey privateKey = ReadPrivateKey(privateKeyString, passphrase);

            MemoryStream outputStream = new MemoryStream();

            PgpSignatureGenerator signatureGenerator = new PgpSignatureGenerator(Org.BouncyCastle.Bcpg.PublicKeyAlgorithmTag.RsaGeneral, Org.BouncyCastle.Bcpg.HashAlgorithmTag.Sha256);
            signatureGenerator.InitSign(PgpSignature.BinaryDocument, privateKey);

            PgpLiteralDataGenerator literalDataGenerator = new PgpLiteralDataGenerator();
            Stream literalOut = literalDataGenerator.Open(outputStream, PgpLiteralData.Binary, "filename", inputFile.Length, DateTime.UtcNow);

            byte[] buffer = new byte[1 << 16];
            int len;
            while ((len = inputFile.Read(buffer, 0, buffer.Length)) > 0)
            {
                literalOut.Write(buffer, 0, len);
                signatureGenerator.Update(buffer, 0, len);
            }

            //signatureGenerator.Generate().Encode(literalOut);
            PgpSignature signature = signatureGenerator.Generate();

            // Write the signature to the output stream
            using (Stream signatureStream = new MemoryStream())
            {
                signature.Encode(signatureStream);
                signatureStream.Position = 0;
                signatureStream.CopyTo(outputStream);
            }

            literalOut.Close();            

            outputStream.Position = 0;

            return outputStream;
        }

        private PgpPublicKey ReadPublicKey(string publicKeyString)
        {
            using (Stream keyIn = new MemoryStream(Encoding.UTF8.GetBytes(publicKeyString)))
            using (Stream inputStream = PgpUtilities.GetDecoderStream(keyIn))
            {
                PgpPublicKeyRingBundle publicKeyRingBundle = new PgpPublicKeyRingBundle(inputStream);
                foreach (PgpPublicKeyRing keyRing in publicKeyRingBundle.GetKeyRings())
                {
                    foreach (PgpPublicKey key in keyRing.GetPublicKeys())
                    {
                        if (key.IsEncryptionKey)
                        {
                            return key;
                        }
                    }
                }
            }
            throw new ArgumentException("Can't find encryption key in key ring.");
        }

        private PgpPrivateKey ReadPrivateKey(string privateKeyString, string passphrase)
        {
            using (Stream keyIn = new MemoryStream(Encoding.UTF8.GetBytes(privateKeyString)))
            using (Stream inputStream = PgpUtilities.GetDecoderStream(keyIn))
            {
                PgpSecretKeyRingBundle secretKeyRingBundle = new PgpSecretKeyRingBundle(inputStream);
                foreach (PgpSecretKeyRing keyRing in secretKeyRingBundle.GetKeyRings())
                {
                    foreach (PgpSecretKey key in keyRing.GetSecretKeys())
                    {
                        if (key.IsSigningKey)
                        {
                            PgpPrivateKey privateKey = key.ExtractPrivateKey(passphrase.ToCharArray());
                            if (privateKey != null)
                            {
                                return privateKey;
                            }
                        }
                    }
                }
            }
            throw new ArgumentException("Can't find signing key in key ring.");
        }
    }
}

Thanks for reading! Happy coding !!

Wednesday, 27 September 2023

Service update failure due to Globalupdate script for service model: AOSService on VM failed due to report deployment

Hello Folks, 

I am writing this post specifically to target the issue where step fails due to report deployment. For other issues, you can refer to

https://learn.microsoft.com/en-us/dynamics365/fin-ops-core/dev-itpro/deployment/deployable-package-troubleshooting

While applying recent service update 10.0.36 to my cloud VM, I have received an issue as 

GlobalUpdate script for service model: AOSService Failed on <VM Name>

To identify the exact issue, just navigate to 

C:\DynamicsAX\RunbookExecution-ExecuteParallelRunbook-<PackageId>\Output 

folder in your VM. 

Look for latest AxUpdateInstaller file, scroll through and you will find the error reason. 


Look for the failed step in the AxupdateInstaller file or mentioned failed step over LCS. In my case, it was step 25. Navigate to the folder with the same name. 

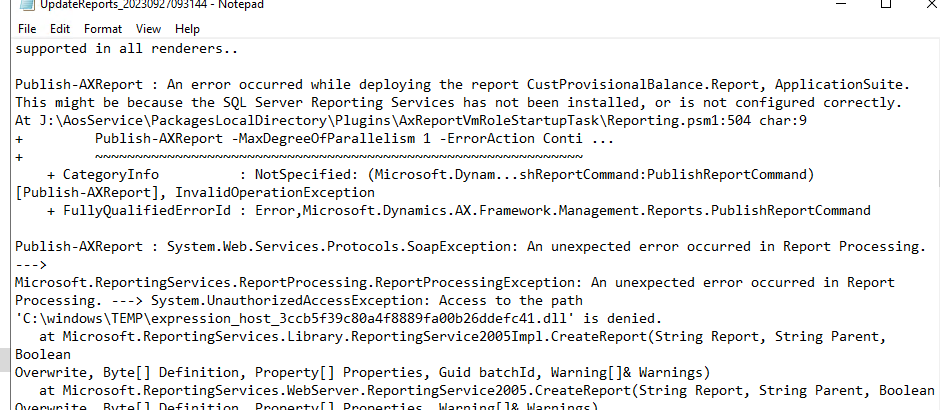
Since the issue was on report, look for latest UpdateReports or UpdateReportsOutput file. Scroll through to find the exact object the deployment has failed on 


As it says, In my case the issue was on CustProvisionalBalance.Report under ApplicationSuite model. 

To resolve this, we can just deploy this report through powershell command under VM. 

To deploy the report, run powershell as Admin and Navigate to   J:\AosService\PackagesLocalDirectory\Plugins\AxReportVmRoleStartupTask>

Then, execute the below command

.\DeployAllReportsToSsrs.ps1 -Module ApplicationSuite -PackageInstallLocation "J:\AosService\PackagesLocalDirectory" -ReportName CustProvisionalBalance.Report

You can change the report or Model name as needed. 

Thats it, Just resume the deployment from LCS. It should then go through with no issues.

Thanks!


Thursday, 19 January 2023

Perform operation at Entity level post all Target data Insert in D365 FnO

There are often requirements where we need to perform some operation(s) Just after target data is inserted/updated fully for all records. 

There is a method that can be used at Entity level known as postTargetProcess

Drawback of this method is that It only can be used with Data management framework in non-set based entities. 

It can also not be used with Odata operations. 

Method can be implemented as below

public class SaddafDemoEntity extends common
{   
    /// <summary>
    /// Post insert into target
    /// </summary>
    /// <param name = "_dmfDefinitionGroupExecution">DMFDefinitionGroupExecution</param>
    public static void postTargetProcess(DMFDefinitionGroupExecution _dmfDefinitionGroupExecution)
    {
       TestHeaderTable      headerTable;
       SaddafDemoStaging    staging;

        select firstonly forupdate integrationImportTable
            where integrationImportTable.DMFExecutionId == _dmfDefinitionGroupExecution.ExecutionId;

        select count(Recid) from staging
            where staging.DefinitionGroup   == _dmfDefinitionGroupExecution.DefinitionGroup
            && staging.ExecutionId          == _dmfDefinitionGroupExecution.ExecutionId
            && staging.TransferStatus       == DMFTransferStatus::Completed;

        ttsbegin;
        headerTable.RecordCount  = staging.RecId
        headerTable.update();
        ttscommit;
    }
}
For Entities using set based operations, we have a tricky workaround by using an Post event handler for a write method of DmfEntityWriter class. 

Point to be noted is, this Class and method is called for all the entities wo we need to make sure of using correct entity and logic inside that to avoid messing whole framework. 

Sample implemention is as below
   [PostHandlerFor(classStr(DmfEntityWriter), methodStr(DmfEntityWriter, write))]
   public static void DmfEntityWriter_Post_write(XppPrePostArgs args)
   {
       	DMFDefinitionGroupExecution  dmfDefinitionGroupExecution = args.getArg('_definitionGroupExecution');
       
       	str entityName = dmfDefinitionGroupExecution.EntityXMLName;

        switch (entityName)
        {
          case 'SaddafDemoEntity':
            TestHeaderTable      headerTable;
       		SaddafDemoStaging    staging;

        	select firstonly forupdate integrationImportTable
            	where integrationImportTable.DMFExecutionId == dmfDefinitionGroupExecution.ExecutionId;

        	select count(Recid) from staging
            	where staging.DefinitionGroup   == dmfDefinitionGroupExecution.DefinitionGroup
            	&& staging.ExecutionId          == dmfDefinitionGroupExecution.ExecutionId
            	&& staging.TransferStatus       == DMFTransferStatus::Completed;

        	ttsbegin;
        	headerTable.RecordCount  = staging.RecId
        	headerTable.update();
        	ttscommit;
          break;
        }
   }
Unfortunately there is nothing similar for Odata, but Odata has its own set of capabilities to supersede all shortcomings.
Thanks for reading!!

Perform operation at Entity level post all Staging data Insert or Before Target insert starts in D365 FnO

As the title suggests, there are sometimes requirements where we need to perform some operation(s) Just before target data insert operation triggers (or in between the whole DMF cycle) but not at the any datasource event or at the Entity insert method. 

One of such requirement can where the Any Header data to be populated before line insertion. 

Good news is we have a way to achieve it via postGetStagingData method at Entity level, Bad news is it works only after staging is inserted and works even if all target data fails validation.

Below is the implementation way for that 

public class SaddafDemoEntity extends common
{
    /// <summary>
    /// Post staging data
    /// </summary>
    /// <param name = "_dmfDefinitionGroupExecution">DMFDefinitionGroupExecution</param>
    public static void postGetStagingData(DMFDefinitionGroupExecution _dmfDefinitionGroupExecution)
    {
        TestHeaderTable      headerTable;
        SaddafDemoStaging    staging;

        select firstonly staging
            where staging.DefinitionGroup   == _dmfDefinitionGroupExecution.DefinitionGroup
            && staging.ExecutionId          == _dmfDefinitionGroupExecution.ExecutionId;

        headerTable.DMFExecutionId =  staging.ExecutionId; //Just the example, you can use any field needed
        headerTable.insert();
ttsbegin; staging = null; update_recordset staging setting ParentRefRecId = headerTable.RecId
where staging.DefinitionGroup == _dmfDefinitionGroupExecution.DefinitionGroup && staging.ExecutionId == _dmfDefinitionGroupExecution.ExecutionId; ttscommit; } }
For Entities using set based operations, we have another method known as preTargetProcessSetbased that can be implemented in similar way as above and is available to use just before Target process initiates (which is obvious by name😃). 

Happy Coding!!!

Wednesday, 16 September 2020

Multiselect lookup on dialog in UI builder class (Sysoperation) in D365 F&O

 This way of setting Multiselectlookup(Lookup that allows Multiple value selections) can be used on any module (SSRS, Service, Batch or simple server/client based service class) utilizing SysOperation framework. 

Code design would be as follows:- 

1. Data contract class: (just showing relevant parameters, there can be other parameters too). Just to note, container type parameter can also be used in place of List.

[DataContract, SysOperationContractProcessing(ClassStr(TestExpImpUIBuilder))]
class TESTEXPDC extends SysOperationServiceBaseDataContract
{
    List                department;    
    
    [DataMemberAttribute, SysOperationLabel("@SYS850"), AifCollectionTypeAttribute('return', Types::String)]
    public List parmDepartment(List _department = department)
    {
        department = _department;

        return department;
    }
}
2. UI Builder Class: This is most important to build a multi select lookup.
class TestExpImpUIBuilder extends SysOperationAutomaticUIBuilder
{
    DialogField         dialogDepartment;
    SysLookupMultiSelectCtrl    ctrlDepartment;
    
    //Override this to add dialog field
    protected DialogField addDialogField(IdentifierName _methodName, Object _dataContract = this.dataContractObject())
    {
        DialogField dialogField;;

        switch (_methodName)
        {
            case methodStr(TESTEXPDC, parmDepartment):
                dialogDepartment = this.dialog().addField(
                    extendedTypeStr(Description),
                    "@SYS850");
                dialogField = dialogDepartment;
                break;
            default:
            dialogField = super(_methodName, _dataContract);
        }
        return dialogField;
    }

    //Override this
    public void postRun()
    {
        super();
        if (this.dataContractObject() is TESTEXPDC) //if is optional, in my case i was using single UI builder for multiple tasks so required
        {
            this.lookupDepartment();
        }
    }
    
    //to populate lookup
    protected void lookupDepartment()
    {
        TableId                 multiSelectTableNum = tableNum(EcoResCategory);
        Query                   query               = new Query();
        QueryBuildDataSource    qbds                = query.addDataSource(multiSelectTableNum);

        EcoResCategoryHierarchyRole categoryRole;

        select firstonly categoryRole
            where categoryRole.NamedCategoryHierarchyRole == EcoResCategoryNamedHierarchyRole::RetailChannelNavigation;

        qbds.addRange(fieldNum(EcoResCategory, Level)).value(queryValue(3));
        qbds.addRange(fieldNum(EcoResCategory, CategoryHierarchy)).value(queryValue(categoryRole.CategoryHierarchy));
        qbds.addSelectionField(fieldNum(EcoResCategory, Code)); //needed for field display in lookup
        qbds.addSelectionField(fieldNum(EcoResCategory, Name));

        container selectedFields = [multiSelectTableNum, fieldNum(EcoResCategory, Code)]; //irrelevant for lookup but value needed for further use in method calling

        ctrlDepartment = SysLookupMultiSelectCtrl::constructWithQuery(this.dialog().dialogForm().formRun(), dialogDepartment.control(), query, false, selectedFields);
    }


    public void getFromDialog()
    {
        super();
        //keep in mind, multiselect actually brings Recid and works like reference lookup
        if (this.dataContractObject() is TESTEXPDC)
        {
            List        listDepartment  = new List(Types::String);
            container   conDeptt = ctrlDepartment.get();

            Counter conCount = 1;
            Counter conDepLength = conLen(conDeptt);

            while (conCount //use sign for less and equal here// conDepLength)
            {
                listDepartment.addEnd(EcoResCategory::find(conPeek(conDeptt, conCount)).Code);
                conCount++;
            }
            this.dataContractObject().parmDepartment(listDepartment);
            
            //whole list code not needed in case you are using container type parameter
            //this.dataContractObject().parmDepartment(ctrlDepartment.get());
        }
    }
}

3. Service class : Its optional and purely based upon requirement. No lookup code is needed here, just needed for execution type and Contract mapping to further call Task based class.

4. Task class: actual iteration of selected multiselect values would be done here.

class TESTEXPTask
{
    List                listDepartment;
    
    public static TESTEXPTask construct()
    {
        return new TESTEXPTask();
    }
    
    public void run(TESTEXPDC _contract)
    {
        this.processDataforExport();
    }
    
    protected void processDataforExport()
    {
        try
        {
            ttsbegin;
            // any code execution
          
            //Line Creation
            this.createLinesPerDepartment();
            ttscommit;

        }
        catch (Exception::Error)
        {
            exceptionTextFallThrough();
        }
    }
    
    protected void createLinesPerDepartment()
    {
        if (listDepartment && !listDepartment.empty())
        {
            ListEnumerator listEnumerator;

            listEnumerator = listDepartment.getEnumerator();
            while (listEnumerator.moveNext())
            {
                this.methodName(listEnumerator.current());
            }
        }
        else
        {
            //call execution code
            this.methodeName();
        }
    }

and you are done. Just squeeze in your other code like additional parameters and business code and voila!!!

Keep in mind, UI builder class in anyways would be used in similar old manner (overridelookup) for conventional field lookups.

See you in next blog. Happy Daxing (Now D365ing)!!! Please drop a feedback in case of any issues or any other concerns.

Tuesday, 10 September 2019

Use Coc(Chain of command) for methods on form datasource/Controls/DataSource fields D365 Finance and Operations

Hi folks, we all might have faced the situation where you needed to use the methods on datasources/controls of d365 standard forms.
Its much easier than you think, only drawback is you don't really have a power of intellisense on this.
But, who cares as long as it works.

Scenario:
Form: SalesTable
Datasource: SalesTableExt (Custom table)
Task: to fillup value in field salestable (recId of salesTable data) on datasource write method.

///
/// extension class for SalesTableExt on form SalesTable
///
[ExtensionOf(formdataSourceStr(SalesTable, SalesTableExt))]
final class SalesTablefdsSalesTableExtTest_Extension
{
    ///    
    /// write method on datasource
    ///    
    void  write()
    {
        this.writePre();
        next write();
    }

    ///    
    /// prewrite method
    ///    
    protected void writePre()
    {
        this.resolveSalesId();
    }

    ///    
    /// salesId(recid) update in SalesTableExt
    ///    
    protected void resolveSalesId()
    {
        FormDataSource      ds              = this;
        SalesTable          salesTable      = ds.formRun().dataSource(formdataSourceStr(SalesTable, SalesTable)).cursor();
        SalesTableExt       salesTableExt   = ds.cursor();

        salesTableExt.SalesTable = salesTable.RecId;
    }

}

Attribute
[ExtensionOf(formdataSourceStr(SalesTable, SalesTableExt))]
defines the object where COC has to be performed.

In a similar way, we can use Coc on form controls. Only difference would be there on attribute for class, it would be like
[ExtensionOf(formControlStr(SalesTable, SalesTableExt_SalesTable))]


and if needed on form datasource control, then attribute would be like
[ExtensionOf(formDatasourceControlStr(SalesTable, SalesTableExt, SalesTable))]


Mind, this can be done only post Update 22.

Thanks!!! See you on next post......

Monday, 23 April 2018

Mark Customer/Vendor Invoice/Invoices for settlement using X++ in D365 or AX 2012

Below method can be used to mark the Invoice amounts for settlement in very easy way.

In your code to loop through ledgerjournaltrans(assuming you already created payment lines for respective Customer/vendor, if not, then create payment record either by X++ or direct entry through payment screens).

Just for reference, i am creating payment via x++ and marked the invoices for settlement.
I am posting full process (create & Post SO, Create Payment entry, Mark invoice for settlement, post payment entry)

form class Declaration.
public class FormRun extends ObjectRun
{   
    CustTable   custtable_g;
    CustInvoiceJour     bitcustInvoiceJour;
}

Below method can be used for SO creation and Payment entry.

public void TestReceipt()
{
    SalesTable salesTable;
    NumberSeq NumberSeq;
    SalesLine salesLine;
    SalesFormLetter formLetterObj;
    InventTable inventTable;

    Ledgerjournalname           ledgerjournalname;
    LedgerjournalTable          LedgerjournalTable;
    LedgerjournalTrans          LedgerjournalTrans;
    LedgerJournalCheckPost      ledgerJournalCheckPost;

    ;

    try
    {
        ttsBegin;
        //Create sales header
        NumberSeq = NumberSeq::newGetNumFromId(SalesParameters::numRefSalesId().NumberSequenceId);
        salesTable.SalesId = NumberSeq.num();
        salesTable.initValue();
        salesTable.CustAccount = custtable_g.AccountNum; //custtable_g is already initialized
        salesTable.initFromCustTable();
        salesTable.insert();

        //Create Sales lines
        salesLine.clear();
        salesLine.SalesId   = salesTable.SalesId;
        salesLine.ItemId    = ItemId.valueStr(); 
        inventTable = InventTable::find(ItemId.valueStr());
        salesLine.initFromInventTable(inventTable);
        salesLine.SalesQty  = Quantity.value();
        salesLine.createLine(NoYes::Yes, // Validate
        NoYes::Yes, // initFromSalesTable
        NoYes::Yes, // initFromInventTable
        NoYes::Yes, // calcInventQty
        NoYes::Yes, // searchMarkup
        NoYes::Yes); // searchPrice

        //confirmation
        //formLetterObj = SalesFormLetter::construct(DocumentStatus::Confirmation);
        //formLetterObj.update(salesTable,Selldate.dateValue());

        //Packing Slip
        formLetterObj = SalesFormLetter::construct(DocumentStatus::PackingSlip);
        formLetterObj.update(salesTable,Selldate.dateValue());

        //Post Invoice
        formLetterObj = SalesFormLetter::construct(DocumentStatus::Invoice);
        formLetterObj.update(salesTable,Selldate.dateValue());

        ttsCommit; 

        //
        ttsBegin;
        bitcustInvoiceJour = formLetterObj.parmJournalRecord();

        //Generate and post receipt

        select ledgerjournalname where ledgerjournalname.JournalName == "PayJ"; //use correct payment journal name

        //ttsBegin;
        LedgerjournalTable.JournalName = ledgerjournalname.JournalName;
        LedgerjournalTable.initFromLedgerJournalName();
        LedgerjournalTable.JournalNum  = JournalTableData::newTable(LedgerjournalTable).nextJournalId();      
        LedgerjournalTable.insert();

        numberSeq                               =   NumberSeq::newGetVoucherFromId((ledgerjournalname.NumberSequenceTable));
        LedgerjournalTrans.Voucher              =   numberSeq.voucher();
        LedgerjournalTrans.JournalNum           =   LedgerjournalTable.JournalNum;
        LedgerjournalTrans.AccountType          =   LedgerJournalACType::Cust;
        LedgerjournalTrans.Company              =   curext();
        LedgerjournalTrans.parmAccount(custtable_g.AccountNum,LedgerjournalTrans.AccountType);
        LedgerjournalTrans.initFromCustTable(custtable_g);
        LedgerjournalTrans.TransDate            = Selldate.dateValue();

        LedgerjournalTrans.ExchRate             =   Currency::exchRate(LedgerjournalTrans.CurrencyCode);

        LedgerjournalTrans.Txt                  =   strFmt('Payment for item sale for sales id : %1',salestable.SalesId);


        LedgerjournalTrans.DefaultDimension         =   custtable_g.DefaultDimension;
        LedgerjournalTrans.OffsetDefaultDimension   =   custtable_g.DefaultDimension;
        LedgerjournalTrans.TransactionType          =   LedgerTransType::Payment;
        LedgerjournalTrans.AmountCurCredit          =   bitcustInvoiceJour.InvoiceAmount;
        LedgerjournalTrans.PaymMode                 =   CustPaymMode.valueStr();
        LedgerjournalTrans.SettleVoucher            =   SettlementType::SelectedTransact;
        LedgerjournalTrans.modifiedField(fieldNum(LedgerjournalTrans,PaymMode));
        LedgerjournalTrans.insert();


        element.settlement(LedgerjournalTrans,LedgerjournalTrans.AmountCurCredit); //look for method

        //Post Journal
        ledgerJournalCheckPost = LedgerJournalCheckPost::newLedgerJournalTable(LedgerjournalTable,NoYes::Yes);
        ledgerJournalCheckPost.run();

        ttsCommit;
      
        info(strFmt("Journal %1 created for item sales Id %2 to Student id %3",LedgerjournalTable.JournalNum,salestable.SalesId,custtable_g.AccountNum));

    }
    catch
    {
        error("error in generating receipt for sale.");
    }


}

Below method can be used for settlement of required amount
void settlement(ledgerJournalTrans _ledgerJournalTrans,real _amounttoSettle)
{
    SpecTrans insertSpecTrans;
    ;
    insertSpecTrans.SpecCompany = _ledgerJournalTrans.Company;
    insertSpecTrans.SpecTableId = TableNum(ledgerJournalTrans);
    insertSpecTrans.SpecRecId   = _ledgerJournalTrans.RecId;
    insertSpecTrans.RefCompany  = _ledgerJournalTrans.Company;
    insertSpecTrans.RefTableId  = TableNum(custTransOPen);
    insertSpecTrans.RefRecId    = custTransOPen::findRefId(bitcustInvoiceJour.custTrans().RecId).RecId;
    insertSpecTrans.Balance01   = _amounttoSettle;
    insertSpecTrans.Code        = _ledgerJournalTrans.CurrencyCode;
    insertSpecTrans.Payment     = NoYes::No;
    insertSpecTrans.LineNum     = 1;
    insertSpecTrans.insert();

}

yes, I am done here. Thanks!!!

Monday, 12 February 2018

Free Text Invoice - Get InvoiceId before posting an Invoice with X++ in D365 or AX 2012

I came across a requirement where client asked us to display actual Invoice Id before actually posting it in the system(They needed it as per their business, they send Invoices to Customers before posting so if any amendment has to be made, it can be made directly to Order/Free text invoice and post it afterwards).

Luckily, not much change required for this.

Navigate to class CUSTPOSTINVOICE and add new method as below

// method to get/set Invoice and voucher
private container getNumAndVoucher(NumberSeq _numberSeq)
{
   container ret;
   if (custInvoiceTable.InvoiceID != '')
   {
       _numberSeq.parmNumberSequenceCode('');
       _numberSeq.parmNumberSequenceId(0);
       ret = [custInvoiceTable.InvoiceID, custInvoiceTable.Voucher];
   }
   else
   {
       ret = _numberSeq.numAndVoucher();
   }
   return ret;
}

Then, open RUNINTERNAL method of same class for editing and scroll down to the line where it says

numberSeq = this.allocateNumAndVoucher();

Then copy and comment the above line and move to next if/else condition

 if (custInvoiceTable.InvoiceId
                && RetailMCRChannelTable::findForCurrentUser().mcrEnableOrderCompletion)

and modify else part of this as shown below

  //changed, moved from line 164
       numberSeq = this.allocateNumAndVoucher();//paste commented line of code
       if (countryRegion_LTLV)
       {
            [invoiceId, voucher] = this.getNumAndVoucher_W(numberSeq);
            if (! CustInvoiceJour::checkDuplicateNum_W(invoiceId, '', custInvoiceTable.InvoiceDate))
            {
                throw error("@SYS25904");
            }
      }
      else
      {
           //new code
           [invoiceId, voucher] = this.getNumAndVoucher(numberSeq);
      }

After this, include a below piece of code(modify as per the calling place) at required place to save invoiced and voucher for posting.

// to update invoice and voucher
    Select forUpdate custInvoiceTable1 where custInvoiceTable1.RecId == custInvoiceTable.RecId;
    custPostInvoice = new CustPostInvoice(custInvoiceTable1);
    numberSeq = custPostInvoice.allocateNumAndVoucher();

    [invoice,voucher] = numberSeq.numAndVoucher();
    custInvoiceTable1.InvoiceId = invoice;
    custInvoiceTable1.Voucher = voucher;
    custInvoiceTable1.update();


Now you'll have actual invoice id in Invoice field of Free text invoice table(CustInvoiceTable) for further reporting and posting.

Share your thoughts and comments if any.

Friday, 19 January 2018

CRUD with Odata and Data entities in Dynamics 365 for operations - CREATE, UPDATE and DELETE Operations

You can use POSTMAN or FIDDLER for any of the testing. I personally like POSTMAN.

I assume that you have already gone through pages on READ operations. If not, please go through all that for better understanding of upcoming discussion on CREATE,UPDATE and DELETE operations in Dynamics 365 for operations(D365O).

Reading through data entities was fun, isn't it. But as a developer you must be willing to do more than just reading the data using Data entities.

Microsoft has done commendable work in whole data entity framework in D365O, it now can be used as point of entry for other operations such as create, update and delete. This a big relief considering AIF is practically a history for D365O.

Although there are other ways also to deal with data inside D365O, I find using Data entities the easiest.

I have created a custom table named 'BeaconService' for my testing purpose.

1. CREATE operations:

In Odata terminology, D365 CREATE operation can be referred as POST operation. Yes, you are right, that means you have to setup a method type to POST.

URL would look like this

https://*******devaos.cloudax.dynamics.com/data/Beaconservice

Set the Authorization code prefixed by 'bearer'

Then Set the body, keeping mandatory fields like BeaconID(in my case) and dataareaId as shown below.

{
      "EndTime": 0,
      "BeaconNum": "DA:AF:A9:FD:Y6:T4",
      "OfferId": "ST100006",
      "Description": "25% flat discount for your amazing audio experience",
      "EffectiveDate": "2015-12-25T12:00:00Z",
      "StartTime": 0,
      "dataAreaId": "usrt",
      "Category": "Headphones",
      "Offer": "headphones on discounted rate",
      "Brand": "Sony"
}


Now execute it (click on Send button if using POSTMAN).
This will give same output on the postman and error if any. Now you can go to the database or D365 screen to see the data.

2. UPDATE Operations


In Odata terminology, D365 UPDATE operation can be referred as PATCH operation.
i.e., you have to setup method type as PATCH.

URL would look like this
https://*******devaos.cloudax.dynamics.com/data/Beaconservice(BeaconNum='DA:AF:A9:FD:Y6:T4',dataAreaId='usrt')

Difference in the URL as you can see is, you'll have to include your primary key along with datareaid.

Now, Set the Authorization code prefixed by 'bearer'

Then Set the body as below, here you do not have to include primary keys

{
    "Category": "Earphones"
}


Now execute it (click on Send button if using POSTMAN).
This will leave the output screen blank if succeeded and error if any. Go ahead and verify the data.

3. DELETE Operations


In Odata terminology, D365 UPDATE operation can be referred as DELETE operation.
i.e., you have to setup method type as DELETE.

URL would look like this
https://*******devaos.cloudax.dynamics.com/data/Beaconservice(BeaconNum='DA:AF:A9:FD:Y6:T4',dataAreaId='usrt')

Here also, you'll have to include your primary key along with datareaid.

Now, Set the Authorization code prefixed by 'bearer'

Leave the body blank here. 


Then execute it (click on Send button if using POSTMAN).
This will leave the output screen blank if succeeded and error if any.
--------------------------------------------------------------------------------------

I am done here.
Thanks for your time!!!
Shoot the message if anything is missing or needed to be modified.

Saturday, 13 January 2018

DIXF for Multiple AOS running on Single Server for AX 2012

Reg DIXF, AX installer does not allows to configure DIXF if you are going ahead for 2nd AOS on same server.

Luckily, I've got some workaround.

Just open the server installation folder for older AOS where DIXF is working, and copy 3 files as mentioned below
Server path : C:\Program Files\Microsoft Dynamics AX\60\Server\MicrosoftDynamicsAX\bin

Files to be copied:
1. Microsoft.Dynamics.AX.Framework.Tools.DMF.ServiceProxy.dll
2. DMFClientConfig
3. DMFConfig

And the paste these files as it is in Bin folder of other server.

That's it! You are done, open AX and do rest of the DIXF setup and play around.

Wednesday, 22 November 2017

Create Customer Payment journal for Multiple Invoices via X++ in D365 or AX 2012

In my case, I am going to create Payment journal and vouchers based on multiple Free text invoices. Same process can also be followed for multiple Sales orders.
Create a button on Free text invoice / All sales order form and and set 'MultiSelect' property to YES.

Then, On clicked method of the button, write the code as below

void clicked()
{
    CustInvoiceTable        custInvoiceTable_loc;    
    SysOperationProgress    progressBar = new SysOperationProgress();
    Counter                 progressCount,progressTotal;
    Ledgerjournalname       ledgerjournalname;
    LedgerjournalTable      LedgerjournalTable;
    LedgerjournalTrans      LedgerjournalTrans;
    CustTable               custtable_loc;
    NumberSeq               numberSeq;
    CustParameters          custParametersExt;
    #avifiles
    super();

        for (custInvoiceTable_loc = getFirstSelection(CustInvoiceTable_ds);custInvoiceTable_loc;custInvoiceTable_loc = CustInvoiceTable_ds.getNext())
        {//this is just for total count
            if (custInvoiceTable_loc.Posted == NoYes::Yes)
            {
                progressTotal++;
            }
        }
        progressBar.setCaption(strfmt("Creating payment lines"));
        progressBar.setAnimation(#aviUpdate);
        progressBar.setTotal(progressTotal);
        progressCount = 1;

        select ledgerjournalname where ledgerjournalname.JournalName == custParametersExt.CustPaymJournalName;

        ttsBegin;
        LedgerjournalTable.JournalName = ledgerjournalname.JournalName;
        LedgerjournalTable.initFromLedgerJournalName();
        LedgerjournalTable.JournalNum  = JournalTableData::newTable(LedgerjournalTable).nextJournalId();
        LedgerjournalTable.insert();

        for (custInvoiceTable_loc = getFirstSelection(CustInvoiceTable_ds);custInvoiceTable_loc;custInvoiceTable_loc = CustInvoiceTable_ds.getNext())
        {
            progressBar.setText(strfmt("Creating payment for invoice %1,total payment created",custInvoiceTable_loc.InvoiceId,progressCount));
            progressBar.setCount(progressCount);

            if (custInvoiceTable_loc.Posted == NoYes::Yes)
            {
               custtable_loc   = CustTable::find(custInvoiceTable_loc.InvoiceAccount);
               numberSeq                               =   NumberSeq::newGetVoucherFromId((ledgerjournalname.NumberSequenceTable));
               LedgerjournalTrans.Voucher              =   numberSeq.voucher();
               LedgerjournalTrans.JournalNum           =   LedgerjournalTable.JournalNum;
               LedgerjournalTrans.AccountType          =   LedgerJournalACType::Cust;
               LedgerjournalTrans.Company              =   curext();
               LedgerjournalTrans.parmAccount(custtable_loc.AccountNum,LedgerjournalTrans.AccountType);
               LedgerjournalTrans.initFromCustTable(custtable_loc);
               LedgerjournalTrans.TransDate            =   systemDateGet();
               LedgerjournalTrans.Invoice              =   custInvoiceTable_loc.InvoiceId; //Marked Invoice can also be selected if required for settlement
               LedgerjournalTrans.ExchRate             =   Currency::exchRate(LedgerjournalTrans.CurrencyCode);

               LedgerjournalTrans.Txt                  =   strFmt('Payment for Invoice %1',LedgerjournalTrans.Invoice);
    
               LedgerjournalTrans.OffsetAccountType    =   LedgerJournalACType::Bank;//Select as required;
               LedgerJournalTrans.parmOffsetAccount(custParametersExt.BankAccountID,LedgerjournalTrans.OffsetAccountType);

               LedgerjournalTrans.DefaultDimension         =   custtable_loc.DefaultDimension;
               LedgerjournalTrans.OffsetDefaultDimension   =   custtable_loc.DefaultDimension;
               LedgerjournalTrans.TransactionType          =   LedgerTransType::Payment;
               LedgerjournalTrans.InstallmentNum   = installmentNum;
               LedgerjournalTrans.PaymMode         = custPaymMode;
   
               LedgerjournalTrans.AmountCurCredit  =   custInvoiceTable_loc.InvoiceAmount()
    
               LedgerjournalTrans.insert();
            }

            progressCount++;
        }
        ttscommit;

    CustInvoiceTable_ds.reread();
}

That's it!!

Wednesday, 4 October 2017

Create Free text invoice via X++ using Templates in AX 2012 R3

Below is the code snippet to be used in X++ code editor when creating Free text invoice(FTI) using Free text invoice templates.

static void CreateFTIfromTemplate(Args _args)
{
    CustInvoiceTable    custInvoiceTable,custInvoiceTable1;
    CustInvoiceTemplate custInvoiceTemplate;
    CustInvoiceLine     custInvoiceLine;
    CustPostInvoice     custPostInvoice;
    CustTable           custtable;
    CustInvoiceLineTemplate custInvoiceLineTemplate;

    Date  invoiceDate = systemdateget();
    Date  dueDate = systemdateget()+10;


    try
    {
        custtable = Custtable::find("00001");
        custInvoiceTemplate = CustInvoiceTemplate::findByTemplateName("Dues");

        ttsBegin;
        custInvoiceTable.clear();
        custInvoiceTable.OrderAccount = custtable.AccountNum;

        custInvoiceTable.initFromCustInvoiceTemplate(
            custInvoiceTemplate,
            custtable,
            CustRecurrenceInvoiceDefaultType::InvoiceTemplate, //This can be defaulted from customer too
            invoiceDate);
        custInvoiceTable.DueDate = dueDate;
        custInvoiceTable.insert();

        // Creates a free text invoice lines by using customer free text invoice line template.
        while select custInvoiceLineTemplate
            where custInvoiceLineTemplate.CustInvoiceTemplate == custInvoiceTemplate.RecId
        {

            custInvoiceLine.clear();

            custInvoiceLine.insertFromCustInvoiceLineTemplate(custInvoiceLineTemplate,
                                                                custInvoiceTable,
                                                                custtable,
                                                                CustRecurrenceInvoiceDefaultType::InvoiceTemplate); //This can be defaulted from customer too
        }

        //just to be sure for proper distributions
        SourceDocumentProcessor::submitSourceDocumentLinesForHeader(custInvoiceTable.SourceDocumentHeader);

        //post FTI
        Select custInvoiceTable1 where custInvoiceTable1.RecId == custInvoiceTable.RecId;
        custPostInvoice = new CustPostInvoice(custInvoiceTable1);
        custPostInvoice.run();

        ttsCommit;

        info(strFmt("Invoice generated for customer %1", custtable.AccountNum));
    }
    catch
    {
        error(strFmt("Error in generating invoice for customer %1",custtable.AccountNum));
    }

}

Do share your thoughts and if you find anything incorrect here.
Thanks!

Sunday, 20 August 2017

Adding images to appear on POS screens for Dynamics 365 for operations-2

....contnd

you must have already gone through part 1 of the blog. if not, please go through that first before proceeding ahead.

3. Product images:
To make any changes to a image format, we will be using the attribute group "Default product attribute group". if you see the XML for Image, there are 5 different URL tags that are mapped. It simply means that we can have maximum of 5 images stored per product with the suffix of

/Products/ <ProductNumber>_000_001.jpg
/Products/ <ProductNumber>_000_002.jpg
/Products/ <ProductNumber>_000_003.jpg
/Products/ <ProductNumber>_000_004.jpg
/Products/ <ProductNumber>_000_005.jpg

"ProductNumber" here simply means the ItemId we have.

CPOS/MPOS will display same number of images as stored at Product folder

Service Volume(drive)>>Retail Server >>Webroot>>MediaServer >>Products

and product window will look like


Final URL for product will look like
https://*****devret.cloudax.dynamics.com/MediaServer/Products/81100_000_001.png


4. Category images:
"Default category attribute group" can be used to make any required change in format.

Category folder would be
Service Volume(drive)>>Retail Server >>Webroot>>MediaServer >>Categories

Default setup allows Retail server to display the category images by following the URL as
/Categories/{CategoryName}.png

However, if image has some different name or you want to display some other image irrespective of its name. you can follow the steps as mentioned below.

i.) Open product categories form as
Retail and commerce>>Products and categories>> product categories

ii.) Select category where you want to change the image as per your choice
iii). Then, click on Edit button.

iv.) Now, click on CATEGORY tab , it will show more options available under that.

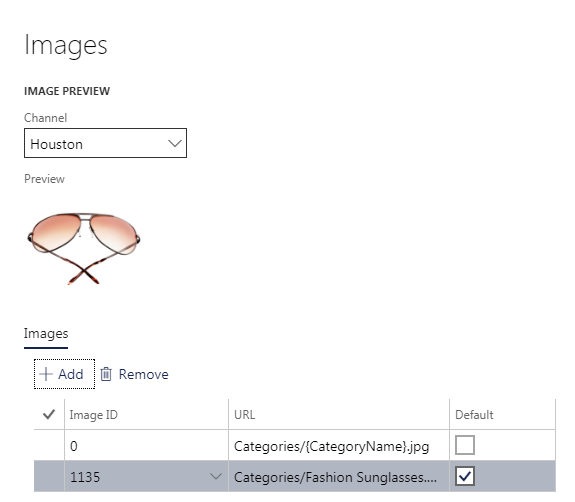
v.) Then click on images, it will open a separate form dialog as shown below.


Current image of Category is as


vi.)  Now, select the required channel and click on Add button. It will again show a popup dialog. I am taking a image as fashion sunglasses for now.
and then click on OK.

vii.) It will save the image as below. Make it default and click on OK.

viii.) click SAVE on category form , run the distribution job 1040 and login to CPOS to see the effect.

final URL to check if image is appearing correctly would be something like this
https://*******devret.cloudax.dynamics.com/MediaServer/Categories/Fashion Sunglasses.png

It is recommended not to change default conventions available to store images. Change only when it is the last option.

That's it for now. Post your suggestions and questions if any.


Adding images to appear on POS screens for Dynamics 365 for operations-1

Ever came to situation when you need to add images for products, Customers, Workers and Categories to be displayed on Cloud POS(CPOS), Modern POS(MPOS), ecommerce site or mobile app or to share an image with some external application.

There is a pretty easy solution provided by MS to overcome all these scenarios easily and in very feasible manner.

1st and most important thing is, you need to identify the required image format or if required you can change the default format to other available formats(jpeg, jpg, gif, png, bmp).

Though the process is almost same for every group, I will proceed for each unit(Customer, Worker, Product and Category) separately.

1. Customer image:
Identify the required format of the image to be used by opening "Attribute groups" form as

Product information management>>setup>>Categories and attributes>>Attribute groups

Then, Select "Default customer attribute group" from left side window(filter), you will see form as below

It shows the attribute of selected attribute group. One of attributes is named as 'Image', we have to play around this only.
If you see the xml beside this, it contains logic that is used by CRT while getting an image for a Customer. So to get the image of a Customer, final URL would be like

<richmedialocationURL>/Customers/<CustomerNumber>.jpg

You can get the URL for richmedialocation as
Retail and commerce>>channel setup>>Channel profiles


So, what is the richmedialocation here. It is the physical path of the location on the D365 server to store media files for Retail.It can be navigated on server as

Service Volume(drive)>>Retail Server >>Webroot>>MediaServer

We 'll be using this path to store the images for entities win their respective groups.e.g., for Customer, we will store its images in path

Service Volume(drive)>>Retail Server >>Webroot>>MediaServer >>Customers

Back to Attribute, Click on Edit to see the default selected format and if required you can change it. A separate form will open as below

Clicking on Entity will show the groups where images can be stored. clicking on file extension will give all the possible formats that can be used to store the images at physical path on server.

If you are changing the file extension, click on OK button to save the changes and run the Distribution schedule job 1150 and 1040.

Let's test this and see if we are getting customer image.
I have a customer Id 004011, I took an image and placed in the previously mentioned Customer folder and renamed the image as 004011.jpg

Now, login to CPOS and search for the customer 004011 and get into the details of customer

Alternatively, you can try out the image URL in your browser to see the resulting image
https://*******devret.cloudax.dynamics.com/MediaServer/Customers/004011.jpg

Same URL can be used by external systems if required.

2. Worker image:
Worker image can also be saved using the same procedure as for Customers. Media server folder will then be Workers in that case

Service Volume(drive)>>Retail Server >>Webroot>>MediaServer >>Workers

and URL to get the worker image would be like
https://*****devret.cloudax.dynamics.com/MediaServer/Workers/000160.jpg

And on POS, it can be seen on top right corner of window.

"Default worker attribute group" can be used to do changes if required.

Although, most of the setup(attribute setup, image location) is similar for product and category images. There is a small change and additional setup required to be done in order to display the images correctly.

I'll explain remaining on my Next blog.

Tuesday, 15 August 2017

Free text invoice using X++ in AX 2012

Today I'll show you to create Free text invoice using X++. I have done it in Indian localization
(after GST), you can skip those steps for other localizations.
I am creating free text invoice for price adjustment to be done on previously created Customer Invoice.

    CustInvoiceJour     custinvoicejour;
    CustInvoiceTrans    custinvoicetrans;    
    CustInvoiceTable    custInvoiceTable,custInvoiceTable1;
    CustInvoiceLine     custInvoiceLine,custInvoiceLine1;
    CustPostInvoice     custPostInvoice;
    CustTable       custtable;
    SalesLine       salesLine;
    SalesLine_IN    salesLinein;
    CustInvoiceLineTaxExtensionIN custInvoiceLineTaxExtensionIN;

    container   offsetDimensions;
    LineNum     lineNum;
    Query   q;
    QueryBuildDataSource    qbds;
    QueryRun    qr;

    q = new Query();

    qbds = q.addDataSource(tableNum(CustInvoiceJour));
    qbds.addRange(fieldNum(CustInvoiceJour, Invoiceaccount)).value("Cust1");
    qbds.addRange(fieldNum(CustInvoiceJour, InvoiceId)).value("TestInvoice1");
    qbds.addRange(fieldNum(CustInvoiceJour, InvoiceId)).value("TestInvoice2");

    qr = new QueryRun(q);

    while(qr.next())
    {
        custinvoicejour = qr.get(tableNum(CustInvoiceJour));
         //info(strFmt("%1, %2",custinvoicejour.InvoiceAccount, custinvoicejour.InvoiceDate));

        ttsBegin;

        custtable = CustTable::find(custinvoicejour.InvoiceAccount);
        custInvoiceTable.clear();
        custInvoiceTable.initFromCustTable(custtable);
        //custInvoiceTable.InvoiceDate = custinvoicejour.InvoiceDate;

        custInvoiceTable.insert();

        lineNum = 0;
        while select custinvoicetrans       
            where custinvoicetrans.InvoiceId == custinvoicejour.InvoiceId
            && custinvoicetrans.InvoiceDate == custinvoicejour.InvoiceDate
        {
            custInvoiceLine.clear();
            custInvoiceLine.initValue();
            
            //setup main account as required 
            offsetDimensions = ["999999","999999", 0, "", ""]; // you can set a Main Account with multiple financial dimensions

            custInvoiceLine.LedgerDimension = AxdDimensionUtil::getLedgerAccountId(offsetDimensions);
            custInvoiceLine.initFromCustInvoiceTable(custInvoiceTable);
            custInvoiceLine.ItemId = "001234"; //custom field     

           
            custInvoiceLine.Quantity = custinvoicetrans.Qty;
            custInvoiceLine.UnitPrice = 2.0 ;
            custInvoiceLine.modifiedField(fieldNum(CustInvoiceLine, UnitPrice));
            custInvoiceLine.Description = custinvoicetrans.itemName();

            //to get HSN code used in original invoice
            select salesLine
                where salesLine.SalesId == custinvoicetrans.SalesId
                && salesLine.ItemId == custinvoicetrans.ItemId;

            select salesLinein
                where salesLinein.SalesLine == salesLine.RecId;

            //Instead of HSNCode, you need to specify Taxgroup and Itemtaxgroup in case of other localizations
            custInvoiceLine.HSNCodeTable_IN = salesLinein.HSNCodeTable;

            custInvoiceLine.ParentRecId = custInvoiceTable.RecId;
            if(!lineNum)
            {
                lineNum = CustInvoiceLine::lastLineNum_W(custInvoiceLine.ParentRecId);
            }

            lineNum += 1;
            custInvoiceLine.LineNum = lineNum;
            custInvoiceLine.InvoiceTxt = custinvoicetrans.InvoiceId+"\n"+date2StrXpp(custinvoicetrans.InvoiceDate);//change it as per need

            custInvoiceLine.insert();
            
            //Specific to Indian localization, not required for other localizations
            custInvoiceLineTaxExtensionIN.CustInvoiceLine = custInvoiceLine.RecId;
            custInvoiceLineTaxExtensionIN.TaxInformation_IN = TaxInformation_IN::findDefaultbyLocation(DirPartyTable::find(CompanyInfo::findDataArea(curext()).PartyNumber).PrimaryAddressLocation).RecId;
            custInvoiceLineTaxExtensionIN.initValue();
            custInvoiceLineTaxExtensionIN.insert();

        }

        //Post free text invoice
        if(lineNum)
        {
            Select custInvoiceTable1 where custInvoiceTable1.RecId == custInvoiceTable.RecId;

            custPostInvoice = new CustPostInvoice(custInvoiceTable1);
            custPostInvoice.run();

            ttsCommit;

        }
        else
        {
            ttsAbort;
        }

    }
}
This is it. Share your ideas and thoughts if any.

Saturday, 12 August 2017

Authorizing Dynamics 365 for Operations user to activate Cloud POS or Modern POS

I am going to show you today the steps to authorize a user to activate Cloud POS or Modern POS screens.
I am using Demo data set for this purpose and specifically USRT legal entity. I will be activating POS for HOUSTON store.

you can follow the same steps for own retail store and I assume that you already have sufficient knowledge to create Retail stores in D365O.

UserId: saddaf@Saddaftesttenant.onmicrosoft.com

In order to authorize this user for POS activation, it must be associated to a Worker.
So, open a worker from Retail and commerce Menu following a path as:

Retail and commerce >> Retail store financials >> Employees >> workers
Worker form will open as below

I am going to use Worker Alexander(000160) as it has managerial permissions. Non-manager workers like cashier can still login to POS but will not be able to activate it.
To check the permissions, click on POS permissions under Retail Tab. You can setup new user with manager permissions.


Click on Edit button on previous screen to see more information about worker. Please note that Address book of worker must include address book of store. In our case, Houston store has address book as 'houston' and so the worker 000160 contains in its address book as shown below.
This step is required for all workers who are required to log in to POS machines in Houston store.

Now, our next step is to assign a user to worker for signed activation of POS.
In above screen under external identity Tab, click on 'Associate existing identity'. You can also choose to create new identity, but that will be more tricky and so i'll try to cover it in future.
Clicking on 'Associate existing identity' button will open a form as shown below, usually it shows all created users, but you can also filter the user using email.

Now, click on OK button to associate the user with worker.
Then, open POS Devices form following a path as
Retail and commerce >> Channel setp >> POS setup >> Devices
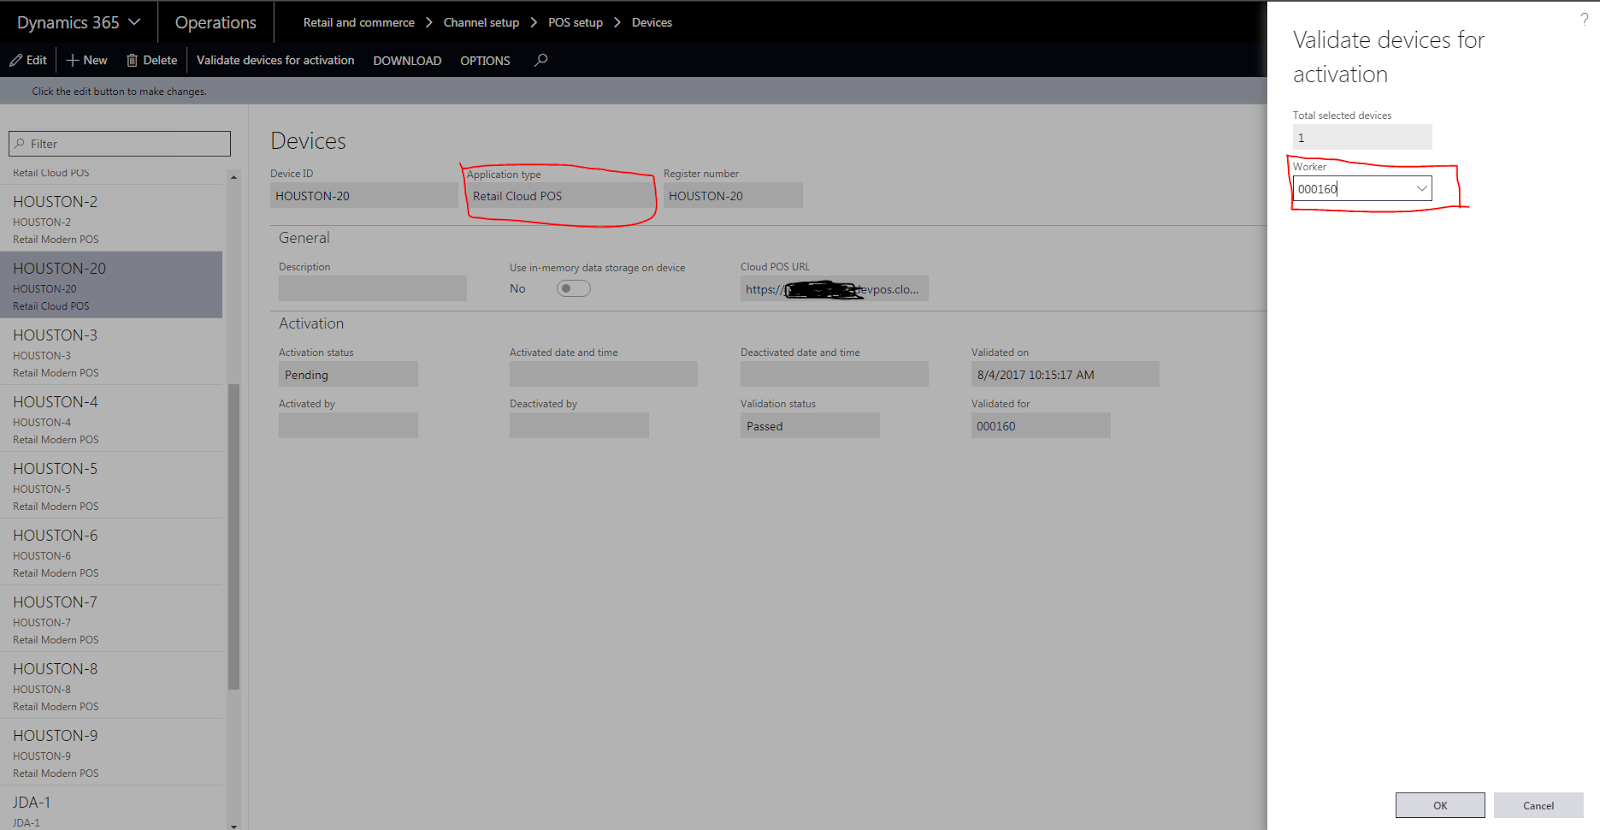
Select application type as required, I am going to activate Cloud POS for HOUSTON-20 as selected above. Now, click on "validate devices for activation" button to open validation screen as shown above and then select worker which we have setup in previous steps and click on OK.
You'll see the success message as shown below, if not then re-verify the previous steps.
Now we are ready to activate Cloud POS.

Open Cloud POS using provided URI in browser(edge browser is best supported). URI will look something as
https://<hostURI>devpos.cloudax.dynamics.com/

On clicking Next, It will ask you to provide authorized user credentials to proceed for activation screen. I'll be using same user as mentioned on top to get up to that screen.
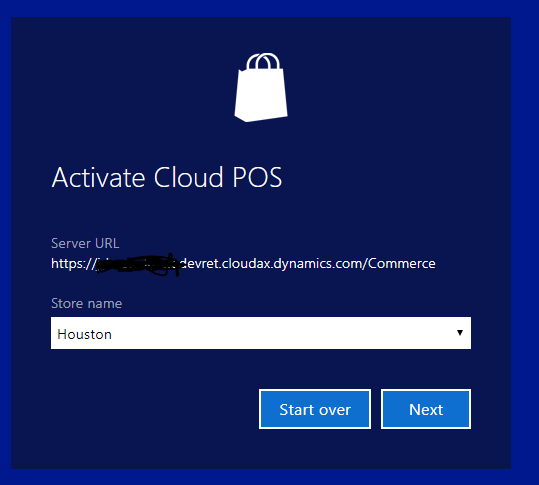
Retail server URL is filled automatically and will look like
https://<hostURI>devret.cloudax.dynamics.com/
Click on Next button to validate the URL and to retrive Stores automatically. you can opt to enter the these details manually. On the next screen, select store as 'HOUSTON' and click next.

Next screen will give away all Register-Devices combination that are available to activate. If you'll click on drop down, it will show all devices with status as Activated or Pending. We'll select HOUSTON-20
Then Final step is to Click on Activate button. It creates device token and collects all related configurations. You'll see the final screen as below.


Great, you have now activated the cloud POS. Let's see how it looks and what effects are done on D365O side.
Click on Get started button on above screen.

Kool, now enter worker credentials created in D365O(remember only workers which contains address book as 'houston' will be able to login here). You'll see the differences in POS screens/options for manager and non-manager roles. For 000160, default password is 123.

Kool, isn't it? Only internet connectivity and browser is required to activate Cloud POS(CPOS). It can be used on any kind of device be it Windows PC,Mac PC, Mobile, tablets.
Keep in mind,1 Device can only remain activated for 1 browser. Even, activating it in another browser on same machine will override the previous activation.

Now, move to D365O screen in Devices form and select HOUSTON-20.

You can see that Device status has been updated as 'Activated' with its Activation date&time and Activated by(worker id).

Thanks. Do share your thoughts or queries.